 0 1 2 3 4 5 6 7 8 9 10 11 12 13 14 15 16 17 18 19 20 21 22 23 24 25 26 27 28 29 30 31 32 33 34 35 36 37 38 39 40 41 42 43 44 45 46 47 48 49 50 51 52 53 54 55 56 57 58 59 60 61 62
 The first set I modeled, as a sort of save file for the castle that's been sitting on my bookshelf for years. It was built using all but one of the gray castle wall pieces that I own, which means it's the size of three major Lego® castles and several minor castle sets combined. For scale, its baseplates are the ones from 6080 King's Castle, but it occupies a larger portion of them. It hinges open and pegs closed like the official castles do, so in theory it could be connected to them—if I hadn't used up all their wall pieces building it. Putting the sine-wave ripple into the pennants was stupidly difficult, and required me to learn how to use isosurfaces.
0 1 2 3 4 5 6 7 8 9 10 11 12 13 14 15 16 17 18 19 20 21 22 23 24 25 26 27 28 29 30 31 32 33 34 35 36 37 38 39 40 41 42 43 44 45 46 47 48 49 50 51 52 53 54 55 56 57 58 59 60 61 62
This is another one that I built decades ago, and have had kicking around ever since, because I didn't want to take it apart. Now that I have the model as a save file, I could, but still haven't.
 0 1 2 3 4 5 6 7 8 9 10 11 12 13 14 15 16 17 18 19 20 21 22 23 24 25 26 27 28 29 30 31 32 33 34 35 36
Long ago, I crashed the White Adept, and couldn't get it to go back together quite right, but i got it close enough that I didn't want to fiddle with it anymore and risk not being able to get it back together at all. After I modeled it so I had build instructions for it as it was, I took it apart and put it back together what I think was how it was originally built. And then I took it apart again, and rebuilt it to fix some of the issues the original design had. That's this version, which is slightly larger than the original — the undercarriage is a plate taller to fit a computer into the cockpit — has some added feature — notably pilot controls, the aforementioned computer... and to be fair I don't think I actually owned the white levers when I originally built it — and a lot more sturdily built — the main function of the targeting computers at the back is to stop the engine mounts from falling off.
The original White Adept was the second model I made, and actually the oldest code, because I completely rebuilt the Castle, and revisiting that code when I modeled this one was... interesting. I hadn't realized how much my techniques for doing this have evolved over the years.
 0 1 2 3 4 5 6 7 8 9 10 11 12 13 14 15 16 17 18 19 20 21 22 23 24 25
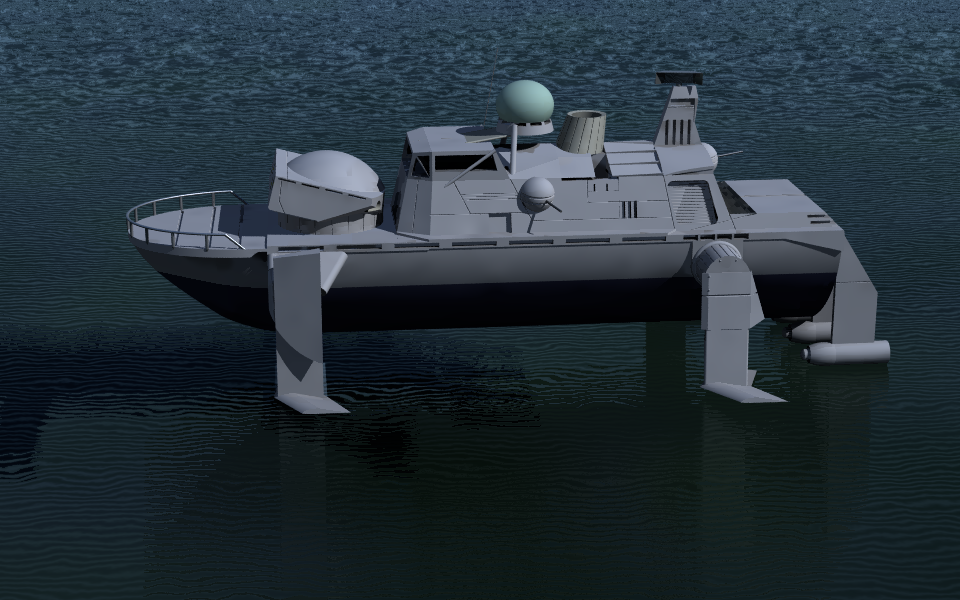
A lot of my builds revolve around a single feature that I got interested in and designed the rest of the build to incorporate. In this case, the whole ship came out of an effort to use the Airport control tower's outward-sloped windows for something else. I got the horizontal unit to vertical unit ratio slightly off on the canopy; the wing pieces on the sides don't quite line up right with the window pieces. The real-world engineering tolerances are loose enough that it works, but the misalignment is apparent in the model if you look closely. The other constraint I was working under, using only gray (and clear) parts, wasn't really all that constraining, because between the Castle and Space sets, I have so much gray Lego, much of it specifically intended for building spaceships.
 0 1 2 3 4 5 6 7 8 9 10 11 12 13 14 15 16 17 18 19 20 21 22 23 24 25 26 27 28 29 30 31 32 33 34 35 36 37 38 39 40 41 42 43 44 45 46 47 48 49 50 51 52 53 54 55 56 57 58 59 60 61 62 63 64 65 66 67 68
The constraint of using only black was a lot more constraining. I had some interesting parts to work with, but I have (or had; I've acquired more in some of the newer sets) a very limited number of black parts that allowed me to change build directions, and none of them were large. As a result, in order to mount the engines on the back, rather than just using angle brackets like the Grey and White ships, I ended up building the ship in two sections, one of them built sideways, which slide together and interlock. The black 3×2 slope piece with the classic Space logo does not actually exist. As far as I can tell, they were made only in white, gray, and blue. The actual piece—apparently the only black 3×2 slope I own—is the "SPACE POLICE" piece from 6813 Galactic Chief. But I like the Space logo better. I have no idea where the black radar dish came from. I found it outside half-buried in the dirt one day.
 0 1 2 3 4 5 6 7 8 9 10 11 12 13 14 15 16 17 18 19 20 21 22 23 24 25 26 27 28 29 30 31 32 33 34 35 36 37 38 39 40 41 42 43 44 45 46 47 48 49 50 51 52 53 54 55 56 57 58 59 60 61 62 63 64 65 66 67 68 69 70 71 72 73 74 75 76 77 78 79 80 81 82 83 84 85 86 87 88 89 90 91 92 93 94 95 96 97 98 99
When the Space line was first introduced, there were only red and white suits. The yellow suits were introduced next, and then the blue and black. (So the Space guy from The LEGO Movie is actually not one of the real old-school Space guys.) The roles the different suit colors appeared in were almost consistent enough that they could be assigned specific meanings, like Starfleet uniforms or real-world flight deck crews. The yellow guys normally came with ground vehicles, so in my headcanon the yellow suits signify ground crew. So that's why all of these little ground units I built have yellow drivers.
 0 1 2 3 4 5 6 7 8 9 10 11 12 13 14 15 16 17 18 19 20 21 22 23 24 25 26
The actual Ore Hauler is currently sitting on my table with its dumper full of pyrite and other interesting rocks.
 0 1 2 3 4 5 6 7 8 9 10 11 12 13 14 15 16 17 18 19 20 21 22 23 24 25
 0 1 2 3 4 5 6 7 8 9 10 11 12 13 14 15 16 17 18 19
 0 1 2 3 4 5 6 7 8 9 10 11 12 13 14 15 16 17 18 19 20 21 22 23 24 25 26 27 28 29 30 31 32 33 34 35 36 37 38 39 40 41 42 43 44 45
It looks unassuming, but nearly half of its parts were new and had to be modeled for the purpose, a percentage nothing since the first set I modeled, before I even had a parts library, has even approached. This included the 2×4×2 windshield, which is stupidly complicated and made moreso by inability to hide cheating behind opaque surfaces. And it's driverless because I still haven't even attempted the driver's hair.
 0 1 2 3 4 5 6 7 8 9 10 11 12 13 14 15 16 17 18 19 20
Both of them really need to be plastered with more corporate logos, but I only have so many product-placement pieces.
 0 1 2 3 4 5 6 7 8 9 10 11 12 13 14 15 16 17 18 19 20 21 22 23 24 25 26 27 28 29 30 31 32
Being able to do this sort of thing is seriously the only reason I got Camouflaged Outpost.
 0 1 2 3 4 5 6 7 8 9 10 11 12 13 14 15 16 17 18 19 20 21 22 23 24 25 26 27 28 29 30 31 32
Ugly but functional. The colors are true to life—I didn't have enough of the necessary kinds of bricks in any one color to make it less of a melange, or even to match left to right. But it will throw a small rock the length of my driveway. It has a 45-stud arm with the sling extending it another 25 studs or so, and uses two bucks in pennies and the ballast brick from 4010 Police Boat (which I'm probably never going to model because the hull), which is that large black brick just above the penny box, as the counterweight. The hook at the tip is adjustable to tweak the sling release timing, but I've found it seems to work best when it's in line with the arm anyway. I did discover when modeling this that Rescue-1's tail boom is not the only 2×10 brick I own—there's a white one in here, from the old generic bricks we had in the '70s, from the looks of it.
 0 1 2 3 4 5 6 7 8 9 10 11 12 13 14 15 16 17 18 19 20 21 22 23 24 25 26 27 28 29 30 31 32 33 34 35 36 37 38 39 40 41 42 43 44 45 46 47 48 49 50
This is another one that came from an idea about how to use a specific part. In this case, it was the swing wings, though the final design is much different than the original concept, which used turntables. It's unusual in not being minifig scale, which I usually build to. I think it should be just about right to put one of the tiny gold guys from Zoids inside the cockpit piece, but though I have the Zrk on top of my bookcase, I can't find any of the crew. I was reminded while trying to figure out where the white triangle pieces towards the back came from that the mini-AT-AT set came with part of a mini Y-wing, which I had entirely forgotten about, but now have to model.
 0 1 2 3 4 5 6 7 8 9 10 11 12 13 14 15 16 17 18 19 20 21 22 23 24 25 26 27 28 29
I needed BattleTech minis for a Monitor and some Sea Skimmers, and didn't have anything even vaguely resembling a boat at the right scale, so I built some, using mostly the spare parts from the Probe Droid and Medieval Blacksmith. I never got to actually deploy the Sea Skimmer. Dice and Battletech hex grid for scale.
I've been re-rendering these at higher quality, because the machine I'm using now is an order of magnitude or two faster than the one I initially modeled this on, and because I improved the heater shield to be more accurately shaped, so I added some of the minifigs as well. Just the footmen for now, because I still haven't attempted to model the horses. There should be four knights as well.
 0 1 2 3 4 5 6 7 8 9 10 11 12 13 14 15 16 17 18 19 20 21 22 23 24 25 26 27 28 29 30 31 32 33 34 35 36 37 38 39 40 41 42 43 44 45 46 47 48 49 50 51 52 53 54 55 56 57 58 59 60 61 62 63 64 65 66 67 68 69 70 71 72 73 74 75 76 77 78 79 80 81 82 83 84 85 86 87 88 89 90 91 92 93 94 95 96 97 98 99 100 101 102 103 104 105 106 107 108 109 110 111 112 113 114 115 116 117 118 119 120 121 122 123 124 125 126 127 128 129 130
The set also includes two mounted knights, which I haven't included because I haven't modeled the horses and saddles or the bar-grilled helms and plumes.
 0 1 2 3 4 5 6 7 8 9 10 11 12 13 14 15 16 17 18 19 20 21 22 23 24 25 26 27 28 29 30 31 32 33 34 35 36 37 38 39 40 41 42 43 44 45 46 47 48 49 50 51 52 53 54 55 56 57 58 59 60 61 62 63 64 65 66 67 68 69 70 71 72 73 74 75 76 77 78 79 80 81 82 83 84 85 86 87 88 89 90 91 92 93 94 95 96 97 98 99 100 101 102 103 104 105 106 107 108 109 110 111 112 113 114 115 116 117
The set also includes two mounted knights, which I haven't included because I haven't modeled the horses and saddles or the bar-grilled helms and plumes.
 0 1 2 3 4 5 6 7 8 9 10 11 12 13 14 15 16 17 18 19 20 21 22 23 24 25 26 27 28 29 30 31 32 33 34 35 36 37 38 39 40 41 42 43 44 45 46 47 48 49 50 51 52 53 54 55 56 57 58 59 60 61 62 63 64 65 66 67 68 69 70 71 72 73 74 75 76 77
 0 1 2 3 4 5 6 7 8 9 10 11 12 13 14 15 16 17 18 19 20 21 22 23 24 25 26 27 28 29 30 31 32 33 34 35 36 37 38 39 40 41 42 43 44 45 46 47 48 49 50 51 52 53 54 55 56 57 58 59 60 61 62 63 64 65 66 67
The set also includes a mounted knight, which I haven't included because I haven't modeled the horse and saddle or the bar-grilled helm and plumes.
 0 1 2 3 4 5 6 7 8 9 10 11 12 13 14 15 16 17 18 19 20 21 22 23 24 25 26 27 28 29 30 31 32 33 34 35 36 37 38 39 40 41 42 43 44 45 46 47 48 49 50 51 52 53 54 55 56 57 58 59 60 61 62 63 64 65 66 67 68 69 70 71
The pitchfork is missing because mine is actually missing, so I don't have one to use as the basis for modeling. The blacksmith is missing because I don't want to try to model his coif.
 0 1 2 3 4 5 6 7 8 9 10 11 12 13 14 15 16 17 18 19 20 21 22 23 24 25 26 27 28 29 30 31 32 33 34 35 36 37 38
This is an alternate build from 6040 Blacksmith's Shop. There's supposed to be a cart that goes with it, but I don't have horse or driver for it (because of the driver's weird coif, and the horse's... horse), so it hardly seems worth doing.
 0 1 2 3 4 5 6 7 8 9 10 11 12 13 14 15 16 17 18
No horses or weird hats or hair or anything, so you get minifigs!
 0 1 2 3 4 5 6 7 8 9 10 11 12 13 14 15 16 17 18 19 20 21 22 23 24 25 26 27
The guy with the lance is supposed to be mounted, but isn't because I haven't modeled the horses.
 0 1 2 3 4 5 6 7 8 9 10 11 12 13 14 15 16 17 18 19 20 21 22 23
This thing is ridiculous. 2164 pieces; the build instructions are a 240-page book. I've had to model more than a hundred new pieces, and many of those are weird and difficult to model: leaf clusters, flowers, elephant trunks, plumes, helical scrollwork. And even at that, there are several pieces that I didn't even attempt to model, like the various animals and the minifig hairpieces. At one point I spent literally an entire day on two parts: the light brick and the new longsword. I had to model two new parts just to do Step 1, which involved two parts. I had to generate a bunch of new colors, too, which proved surprisingly difficult, because Lego has this bad habit of using greens that apparently exist outside the RGB colorspace.
 0 1 2 3 4 5 6 7 8 9 10 11 12 13 14 15 16 17 18 19 20 21 22 23 24 25 26 27 28 29 30 31 32 33 34 35 36 37 38 39 40 41 42 43 44 45 46 47 48 49 50 51 52 53 54 55 56 57 58 59 60 61 62 63 64 65 66 67 68 69 70 71 72 73 74 75 76 77 78 79 80 81 82 83 84 85 86 87 88 89 90 91 92 93 94 95 96 97 98 99 100 101 102 103 104 105 106 107 108 109 110 111 112 113 114 115 116 117 118 119 120 121 122 123 124 125 126 127 128 129 130 131 132 133 134 135 136 137 138 139 140 141 142 143 144 145 146 147 148 149 150 151 152 153 154 155 156 157 158 159 160 161 162 163 164 165 166 167 168 169 170 171 172 173 174 175 176 177 178 179 180 181 182 183 184 185 186 187 188 189 190 191 192 193 194 195 196 197 198 199 200 201 202 203 204 205 206 207 208 209 210 211 212 213 214 215 216 217 218 219 220 221 222 223 224 225 226 227 228 229 230 231 232 233 234 235 236 237 238 239 240 241 242 243 244 245 246 247 248 249 250 251 252 253 254 255 256 257 258 259 260 261 262 263 264 265 266 267 268 269 270 271 272 273 274 275 276 277 278 279 280 281 282 283 284 285 286 287 288 289 290 291 292 293 294 295 296 297 298 299 300 301 302 303 304 305 306 307 308 309 310 311 312 313 314 315 316 317 318 319 320 321 322 323 324 325 326 327 328 329 330 331 332 333 334 335 336 337 338 339 340 341 342 343 344 345 346 347 348 349 350 351 352 353 354 355 356 357 358 359 360 361 362 363 364 365 366 367 368 369 370 371 372 373 374 375 376 377 378 379 380 381 382 383 384 385 386 387 388 389 390 391 392 393 394 395 396 397 398 399 400 401 402 403 404 405 406 407 408 409 410 411 412 413 414 415 416 417 418 419 420 421 422 423 424 425 426 427 428 429 430 431 432 433 434 435 436 437 438 439 440 441 442 443 444 445 446 447 448 449 450 451 452 453 454 455 456 457 458 459 460 461 462 463 464 465 466 467 468 469 470 471 472 473 474 475 476 477 478 479 480 481 482 483 484 485 486 487 488 489 490 491 492 493 494 495 496 497 498 499 500 501 502 503 504 505 506 507 508 509 510 511 512 513 514 515 516 517 518 519 520 521 522 523 524 525 526 527 528 529 530 531 532 533 534 535 536 537 538 539 540 541 542 543 544 545 546 547 548 549 550 551 552 553 554 555 556 557 558 559 560 561 562 563 564 565 566 567 568 569 570 571 572 573 574 575 576 577 578 579 580 581 582 583 584 585 586 587 588 589 590 591 592 593 594 595 596 597 598 599 600 601 602 603 604 605 606 607 608 609 610 611 612 613 614 615 616 617 618 619 620 621 622 623 624 625 626 627 628 629 630 631 632 633 634 635 636 637 638 639 640 641 642 643 644 645 646 647 648 649 650 651 652 653 654 655 656 657 658 659 660 661 662 663 664 665 666 667 668 669 670 671 672 673 674 675 676 677 678 679 680 681 682 683 684 685 686 687 688 689 690 691 692 693 694 695 696 697 698 699 700 701 702 703 704 705 706 707 708 709 710 711 712 713 714 715 716 717 718 719 720 721 722 723 724 725 726 727 728 729 730 731 732 733 734 735 736 737 738 739 740 741 742 743 744 745 746 747 748 749 750 751 752 753 754 755 756 757 758 759 760 761 762 763 764 765 766 767 768 769 770 771 772 773 774 775 776 777 778 779 780 781 782 783 784 785 786 787 788 789 790 791 792 793 794 795 796 797 798 799 800 801 802 803 804 805 806 807 808 809 810 811 812 813 814 815 816 817 818 819 820 821 822 823 824 825 826 827 828 829 830 831 832 833 834 835 836 837 838 839 840 841 842 843 844 845 846 847 848 849 850 851 852 853 854 855 856 857 858 859 860 861 862 863 864 865 866 867 868 869 870 871 872 873
The original 1970s Lego® Castle. This is the one set here that I neither designed nor own. I always wanted it, but it went OOP before I was able to get it. I modeled it from build instructions on the Internet because I wanted to see how it was actually put together, and all of the parts except the flagpole are ones I have at least one of from other sources. Unlike most of the other castle sets here, it includes the minifigs, because it doesn't use the modern molded horses, which I probably could model, but really don't want to.
 0 1 2 3 4 5 6 7 8 9 10 11 12 13 14 15 16 17 18 19 20 21 22 23 24 25 26 27 28 29 30 31 32 33 34 35 36 37 38 39 40 41 42 43 44 45 46 47 48 49 50 51
I may have been the last person in the world to actually receive this set. I mail-ordered it, and shortly after it arrived, a friend of mine, envious of my visored helms, did likewise. He got an apology letter and a newer minifigs set, with '80s-era Castle minifigs (this one, I think), substituted. There's some dispute on Bricklink about which of the parts inventory or the catalog photograph is actually correct. The actual answer, as best I can tell from my recollection and the inventory of parts I actually have, some of which can only have come from this set, appears to be neither
.
I'm not sure this one is even mine. It may be something of my brother's that ended up mixed in with my Legos during a move.
 0 1 2 3 4 5 6 7 8 9 10 11 12 13 14 15 16 17 18 19 20 21 22 23 24 25 26 27
This was the first actual Lego® set I owned. We had Legos before this, but they were all just basic bricks. And I do mean "bricks"—not even any plates, though there were some door, window, and shutter pieces and a set of weird wheels with axle-socket bricks.
 0 1 2 3 4 5 6 7 8 9 10 11 12 13 14 15 16 17 18 19 20 21 22 23 24 25 26 27 28 29 30 31 32 33 34 35 36 37 38 39 40 41 42 43 44 45 46 47 48 49 50 51 52 53 54 55 56 57 58 59 60 61 62 63 64 65 66
Thanks to Sylvain Sauvage for the heightfield that makes the crater baseplate possible.
 0 1 2 3 4 5 6 7 8 9 10 11 12 13 14 15 16 17 18 19 20 21 22 23 24 25 26 27 28 29 30 31 32 33 34 35 36 37 38 39 40 41 42 43 44 45 46 47 48 49 50 51 52 53 54 55 56 57 58 59 60 61 62 63 64 65 66 67 68 69 70 71 72 73 74 75 76 77 78 79 80 81 82 83 84 85 86 87 88 89 90 91 92 93 94 95 96 97 98 99 100 101 102 103 104
 0 1 2 3 4 5 6 7 8 9 10 11 12 13 14 15 16 17 18 19 20 21 22 23 24 25 26 27 28 29 30 31 32 33 34 35 36 37 38 39 40 41 42 43 44 45 46 47 48 49 50 51 52 53 54 55 56 57 58 59 60 61 62 63 64 65 66 67 68 69 70 71 72 73 74 75 76 77 78 79 80 81 82 83 84 85 86 87 88
This is supposed to have two flexible hoses linking the connectors on the wings and behind the faceted thingie, but I don't even want to think about modeling that weird three-dimensional twist.
 0 1 2 3 4 5 6 7 8 9 10 11 12 13 14 15 16 17 18 19 20 21 22 23 24 25 26 27 28 29 30 31 32 33 34 35 36 37 38 39 40 41 42 43 44 45 46 47 48 49 50 51 52 53 54 55 56 57 58 59 60 61 62 63 64 65 66
This had three new parts in it. One of them was trivial; the other two were terrible. The trivial one was the fenders for the tractor. I'd already done the studded-top ones that the trailer uses for the Land Rover, and smooth-topped was easier. The first awful one was the faucets. The tap is a bunch of complex curves where none of the dimensions are any of the standard Lego® units which normally appear everywhere, so I ended up basically using CSG to carve it out of geometric primitives by eyeball. I think it came out pretty well, considering. And now I'm never going to use it again. This is the only set I have (or even know of) that includes them, and they're weird and special-purpose enough that I never use them in original builds. The other was the rubber hoses. The ones on the fuel tanker are just cylinders and torus sections cut, rotated, and spliced together into a reasonable-looking spiral of the right length. The one on the support boom is a sphere_sweep that actually follows the physically correct catenary arc. It's kind of the opposite of the typical catenary example. Generally when you see catenaries, it's to describe the sag of hanging cables or chains (the word comes from Latin catena, "chain", in fact). In this case, rather than being formed by gravity pulling against the tension in the chain, it's formed by the compression of the hose pushing it out. But it ends up with the same shape.
 0 1 2 3 4 5 6 7 8 9 10 11 12 13 14 15 16 17 18 19 20 21 22 23 24 25 26 27 28 29 30 31 32 33 34 35 36 37 38 39 40 41
This took me less than an hour to model from beginning to end. It's the first set I haven't had to create any new parts for.
This really seems like it ought to have two minifigs.
 0 1 2 3 4 5 6 7 8 9 10 11 12 13 14
Unlike the previous tiny set I did, this one took more like six hours to model. The problem was new parts. The balloon tires and the metal detector were surprisingly not bad—metal detector was much easier than the similar shoulder scope—but the storage compartment and its door were surprisingly nasty.
This thing has seriously no ground clearance. The 2×2 plate at the bottom of the running gear is less than half the thickness of a plate above level ground, and the weird rocker-arm suspension actually makes it worse... basically any tilt to the rockers brings the leading or trailing edge of that plate past the plane of the wheels, and it starts digging trenches. I thought I was going to get away with this one without having to make any new parts—I did the metal detectors and balloon tires for the Surface Transport—but it turned out not. The blue and gray hinge plates here are subtly different from the black ones I modeled way back for the Castle (which originally came in 6392 Airport)—they have solid studs instead of hollow ones. They're also different from the yellow ones that came in 6950 Mobile Rocket Transport, which have a different arrangement of the hinge prongs.
 0 1 2 3 4 5 6 7 8 9 10 11 12 13 14 15 16 17 18 19 20 21 22 23 24 25 26 27 28 29 30 31 32 33 34 35 36 37 38 39 40 41 42 43 44 45 46 47 48
I discovered while modeling parts for this that I apparently have two subtly different variations on the tall support struts: These, where the strut is a plate-height wide at the edges, and half that in the middle, and newer ones, which came in 6971 Intergalactic Command Base, which are about 50% thicker. I assume in the newer set, they were made thicker for strength. Ironically, the only one of these I have that's actually bent is one of the thicker gray ones from Intergalactic Command Base.
 0 1 2 3 4 5 6 7 8 9 10 11 12 13 14 15 16 17 18 19 20 21 22 23 24 25 26 27 28
This is another one that should have flexible rubber hoses (linking the radars on the roof to the bits sticking up behind them), but doesn't because I can't figure out how to realistically model the weird three-dimensional twist, especially while maintaining correct hose length. As mentioned above, while the tall struts are nominally the same part as the ones the Space Supply Station uses, they're actually thicker, and despite that, the only one I have that's actually bent is one of the gray ones from this set. The crater baseplates take forever to render at high radiosity settings, and this set has two of them. The final renders took my whole render farm four and a half days.
 0 1 2 3 4 5 6 7 8 9 10 11 12 13 14 15 16 17 18 19 20 21 22 23 24 25 26 27 28 29 30 31 32 33 34 35 36 37 38 39 40 41 42 43 44 45 46 47 48 49 50 51 52 53 54 55 56 57 58 59 60 61 62
I put off doing this one because I didn't want to have to model the arms. As it turned out, except for the claw's jaws, they were pretty easy—far better than the similar parts from the AT-AT—though making the joints individually and independently articulate results in some ridiculous macro declarations.
 0 1 2 3 4 5 6 7 8 9 10 11 12 13 14 15 16 17 18 19 20 21 22 23
This is what passed for a Space set in the '90s, and pretty much illustrates what went wrong with Lego in the '90s. Compare to older tiny Space sets like the Astro Dasher, which, though physically smaller, has half again as many parts. Fewer parts. Less flexible parts. The design is slapdash — the underside doesn't line up properly, and easily could have, but that would have meant using 17 parts instead of 16 — the canopy hinge is just slapped on top with no effort to integrate it into the design, the megaphone (why does a spaceship have a megaphone) is just jammed into a stud, there's no effort to smooth out the notched wingtips, there's no controls... even just a printed tile slapped on there would have been an improvement.
When I was a kid, we made a family trip to Washington, D.C.. In the parking lot of the hotel, I found a $20 bill. At that age, back in those days, that was a lot of money. I used it to buy most of this set. The moral of these stories, I guess, is: If you want Legos, keep an eye on the ground? This one took forever, because, well, it's a huge set, for starters, with a bunch of new parts in it, and I was having trigonometry issues with the corner-rounding on the wingtips. Remember, just because two triangles look congruent on paper, that doesn't mean they actually are! The clock on the terminal is not strictly part-accurate... because it actually keeps time. The time displayed is the local time the frame started rendering.
 0 1 2 3 4 5 6 7 8 9 10 11 12 13 14 15 16 17 18 19 20 21 22 23 24 25 26 27 28 29 30 31 32 33 34 35 36 37 38 39 40 41 42 43 44 45 46 47 48 49 50 51 52 53 54 55 56 57 58 59 60 61 62 63 64 65 66 67 68 69 70 71 72 73 74 75 76 77 78 79 80 81 82 83 84 85 86 87 88 89 90 91 92 93 94 95 96 97 98 99 100 101 102 103 104 105 106 107 108 109 110 111 112 113 114 115 116 117 118 119 120 121 122 123 124 125 126 127 128 129 130 131 132 133 134 135 136 137 138 139 140 141 142 143 144 145
Only four new parts in this one, but one of them, surprisingly, was a basic brick. I thought at the time that the tail boom was the only 2×10 brick I owned, but I later discovered that there's another one in the Trebuchet.
 0 1 2 3 4 5 6 7 8 9 10 11 12 13 14 15 16 17 18 19 20 21 22 23 24 25 26 27 28 29 30 31 32 33
 0 1 2 3 4 5 6 7 8 9 10 11 12 13 14 15 16
This was quick and easy and didn't require any new parts... except that it's not complete. The set includes a motorcycle, which, like the horses, isn't so much built as molded. It's a much more reasonable shape to model, so I may do it eventually, but for now, part of the set is missing.
 0 1 2 3 4 5 6 7 8 9 10 11 12 13 14 15 16 17 18 19 20 21 22 23
I can't find the instructions for this one, so I had to reverse-engineer it from the pictures and parts list on Bricklink. Fortunately there's only like 40 pieces and most of them are directly visible from the outside.
 0 1 2 3 4 5 6 7 8 9 10 11 12 13 14
Another one that I can't find the instructions for and had to reverse-engineer. Fortunately, it's so much like 6634 Stock Car that I was able to just copy-paste like 90% of the build. Modeling the jack took way longer than doing the entire rest of it.
 0 1 2 3 4 5 6 7 8 9 10 11 12 13 14
Another tiny Town set that I can't find the instructions for and had to reverse-engineer. At least it's simple; it's the smallest official set I have, smaller even than the Astro Dasher. Well, not counting the ones that are just minifigs, maybe.
I can't find the actual instructions from this set, so the build order here may not exactly match the official one, but I've had it kicking around mostly assembled (I'd cannibalized the chin guns at some point to replace cracked lever bases elsewhere), so this is actually how it's supposed to go together. New Legos are ridiculous. Of the 29 distinct parts in this fairly small set, 16 of them had to be modeled for the purpose, and only one of those exists in any other set I own. And most of the new parts are weird and complicated. I don't know how kids are supposed to build with those ratchet hinge things... I really had to work at it to take the legs apart, and I've got the grip strength to deliver a killing blow with a broadsword just by closing my hand. On the other hand, it can't keep its head up, and it falls off entirely with little provocation. As an actual model, it leaves something to be desired, too. The main issue is that the front hips can't swing backwards, and the back hips can't swing forwards, which makes it difficult to get into any kind of reasonable walking pose, and that the joints only move in 20° increments doesn't help. Also it tips over easily if any foot is off the ground, though that may be just be faithfulness to ESB.
 0 1 2 3 4 5 6 7 8 9 10 11 12 13 14 15 16 17 18 19 20 21 22 23 24 25 26 27 28 29 30 31 32 33 34 35 36 37 38 39 40
I used a pair of white 2×4 triangular plates in the Variable Geometry Fighter, and when I was modeling that, I started wondering where they had come from, because every set that I could think of that might be new enough to include those was a) assembled, and b) didn't contain white ones anyway. I was finally reduced to searching on Bricklink, and was reminded that 4489 did in fact include them... they just weren't part of the AT-AT. 4489 was #2 out of 4 sets that included extra parts that built part of a Y-Wing. 4489 included the nose, 4490 Mini Republic Gunship included the fuselage, and 4488 Mini Millennium Falcon and 4491 Mini Trade Federation MTT had the engine pods. 4489 is the only one of them I actually have, or am ever likely to have. The Millennium Falcon is cool, but I already have a better one, and the others are prequel nonsense. I had to model three parts that I don't actually own for this. I thought I had all of them, but one, the grooved 1×2 brick, I know I've handled, but couldn't find in either my parts library or the real world. It may have been in a set I was helping one of my nephews with. I thought the Probe Droid included 2×2 domes in all that stuff in its head, but its domes are actually a size larger, and the astromech head is a different shape. And I had it almost finished when I started thinking that the proportions didn't look quite right, and checked the inventory lists to discover that the rods in the engine pods are actually half a vertical unit longer than the ones I already had in the library.
 0 1 2 3 4 5 6 7 8 9 10 11 12 13 14 15 16 17 18 19 20 21 22 23 24 25 26 27 28 29 30 31 32 33 34 35 36 37 38 39 40 41 42 43 44 45 46 47 48
This thing is surprisingly hefty. It's constructed almost entirely of plates and tiny parts, so it's a lot more solid plastic than most sets its size. This is by far the most complex set I've done. Of the 134 distinct parts in the set, 97 of them were new and had to be modeled for the purpose — though, to be fair, one of those was an axle, which was just a matter of passing a different argument to the Axle() macro. It made up for it by a lot of the others being weird and complicated things, like the blasters it uses for joints
on the smaller arms. On top of that, there were several parts already in the library that I had to improve because the weird ways the thing is built revealed shortcomings in them, like lack of detail in exposed undersides, or parts with interior coincident surface issues that hadn't been a problem until I had to use clear ones.
 0 1 2 3 4 5 6 7 8 9 10 11 12 13 14 15 16 17 18 19 20 21 22 23 24 25 26 27 28 29 30 31 32 33 34 35 36 37 38 39 40 41 42 43 44 45 46 47 48 49 50 51 52 53 54 55 56 57 58 59 60 61 62 63 64 65 66 67 68 69 70 71 72 73 74 75 76 77 78 79 80 81 82 83 84 85 86 87 88 89 90 91 92 93 94 95 96 97 98 99 100 101 102 103 104 105 106 107 108 109 110 111 112 113 114 115 116 117 118 119 120 121 122 123 124 125 126 127 128 129 130 131 132 133 134 135 136 137 138 139 140 141 142 143 144 145 146 147 148 149 150 151 152 153 154 155 156 157 158 159 160 161 162 163 164 165 166 167 168 169 170 171 172 173 174 175 176 177 178 179 180 181 182 183 184 185 186 187 188 189 190 191 192 193 194 195 196 197 198 199 200 201 202 203 204 205 206 207 208 209 210 211 212 213 214 215 216 217 218 219 220 221 222 223 224 225 226 227 228 229 230 231 232 233 234 235 236 237 238 239 240 241 242 243 244 245 246 247 248 249 250 251 252 253 254 255 256 257 258 259 260 261 262 263 264 265 266 267 268 269 270 271 272 273 274 275 276 277 278 279 280 281 282 283 284 285 286 287 288 289 290 291 292 293 294 295 296 297 298 299 300 301 302 303 304 305 306 307 308 309 310 311 312 313 314 315 316 317 318 319 320 321 322 323 324 325 326 327 328 329 330 331 332 333 334 335 336 337 338 339 340 341 342 343 344 345 346 347 348 349 350 351 352 353 354 355 356 357 358 359 360 361 362 363 364 365 366 367 368 369 370 371 372 373 374 375 376 377 378 379 380 381 382 383 384 385 386 387 388 389 390 391 392 393 394 395 396 397 398 399 400 401 402 403 404 405 406 407 408 409 410 411 412 413 414 415 416 417 418 419 420 421 422 423 424 425 426 427 428 429 430 431 432 433 434 435 436 437 438 439 440 441 442 443 444 445 446 447 448 449 450 451 452 453 454 455 456 457 458 459
This has only a little more than half as many pieces as the Medieval Blacksmith, but it may be larger — the very different shapes make it hard to say — and it's definitely more complicated. The Medieval Blacksmith has a lot of small parts, but is mostly brick-on-brick construction. This thing has a lot more large plates and long beams, and a lot of it is clipped and pinned together at odd angles. I had to bust out the Law of Cosines, which I hadn't used in thirty years or more, to figure out some of the angles. The front panel I didn't even attempt to calculate the angles for; I just eyeballed it, and got it to pixel precision on the third attempt. There were quite a few new parts, but most of them were straightforward. I got modeling new wedge plates down to a routine before I was done.
 0 1 2 3 4 5 6 7 8 9 10 11 12 13 14 15 16 17 18 19 20 21 22 23 24 25 26 27 28 29 30 31 32 33 34 35 36 37 38 39 40 41 42 43 44 45 46 47 48 49 50 51 52 53 54 55 56 57 58 59 60 61 62 63 64 65 66 67 68 69 70 71 72 73 74 75 76 77 78 79 80 81 82 83 84 85 86 87 88 89 90 91 92 93 94 95 96 97 98 99 100 101 102 103 104 105 106 107 108 109 110 111 112 113 114 115 116 117 118 119 120 121 122 123 124 125 126 127 128 129 130 131 132 133 134 135 136 137 138 139 140 141 142 143 144 145 146 147 148 149 150 151 152 153 154 155 156 157 158 159 160 161 162 163 164 165 166 167 168 169 170 171 172 173 174 175 176 177 178 179 180 181 182 183 184 185 186 187 188 189 190 191 192 193 194 195 196 197 198 199 200 201 202 203 204 205 206 207 208 209 210 211 212 213 214 215 216 217 218 219 220 221 222 223 224 225 226 227 228 229 230 231 232 233 234 235 236 237 238 239 240 241 242 243 244 245 246 247 248 249 250 251 252 253 254 255 256 257 258 259 260 261 262 263 264 265 266 267 268 269 270 271 272 273 274 275 276 277 278 279 280 281 282 283 284 285 286 287 288 289 290 291 292 293 294 295 296 297 298 299 300 301 302 303 304 305 306 307 308 309 310 311 312 313 314 315 316 317 318 319 320 321 322 323 324 325 326 327 328 329 330 331 332 333 334 335 336 337 338 339 340 341 342 343 344 345 346 347 348 349 350 351 352 353 354 355 356 357 358 359 360 361 362 363 364 365 366 367 368 369 370 371 372 373 374 375 376 377 378 379 380 381 382 383 384 385 386 387 388 389 390 391 392 393 394 395 396 397 398 399 400 401 402 403 404 405 406 407 408 409 410 411 412 413 414 415 416 417 418 419 420 421 422 423 424 425 426 427 428 429 430 431 432 433 434 435 436 437 438 439 440 441 442 443 444 445 446 447 448 449 450 451 452 453 454 455 456 457 458 459 460 461 462 463 464 465 466 467 468 469 470 471 472 473 474 475 476 477 478 479 480 481 482 483 484 485 486 487 488 489 490 491 492 493 494 495 496 497 498 499 500 501 502 503 504 505 506 507 508 509 510 511 512 513 514 515 516 517 518 519 520 521 522 523 524 525 526 527 528 529 530 531 532 533 534 535 536 537 538 539 540 541 542 543 544 545 546 547 548 549 550 551 552 553 554 555 556 557 558 559 560 561 562 563 564 565 566 567 568 569 570 571 572 573 574 575 576 577 578 579 580 581 582 583 584 585 586 587 588 589 590 591 592 593 594 595 596 597 598 599 600 601 602 603 604 605 606 607 608 609 610 611 612 613 614 615 616 617 618 619 620 621 622 623 624 625 626 627 628 629 630 631 632 633 634 635 636 637 638 639 640 641 642 643 644 645 646 647 648 649 650 651 652 653 654 655 656 657 658 659 660 661 662 663 664 665 666 667 668 669 670 671 672 673 674 675 676 677 678 679 680 681 682 683 684 685 686 687 688 689 690 691 692 693 694 695 696 697 698 699 700 701 702 703 704 705 706 707 708 709 710 711 712 713 714 715 716 717 718 719 720 721 722 723 724 725 726 727 728 729 730 731 732 733 734 735 736 737 738 739 740 741 742 743 744 745 746 747 748 749 750 751 752 753 754 755 756 757 758 759 760 761 762 763 764 765 766 767 768 769 770 771 772 773 774 775 776 777 778 779 780 781 782 783 784 785 786 787 788 789 790 791 792 793 794 795 796 797 798 799 800 801 802 803 804 805 806 807 808 809 810 811 812 813 814 815 816 817 818 819 820 821 822 823 824 825 826 827 828 829 830 831 832 833 834 835 836 837 838 839 840 841 842 843 844 845 846 847 848 849 850 851 852 853 854 855 856 857 858 859 860 861 862 863 864 865 866 867 868 869 870 871 872 873 874 875 876 877 878 879 880 881 882 883 884 885 886 887 888 889 890 891 892 893 894 895 896 897 898 899 900 901 902 903 904 905 906 907 908 909 910
This one isn't actually mine; it's my nephew's. I modeled it while visiting over the holidays. I don't have Luke and Biggs because I didn't have time to model the Rebel flight helmet. It did give me a chance to get a hands-on look at the grooved 1×2 brick, though I'm pretty sure this is not the set where I'd previously encountered it. R2's head took the longest, because I had to actually model the decoration. Because of the shape of it, mapping a PNG onto it, like I do for most of the printed pieces (e.g., R2's body) doesn't work well. Fortunately, it's the same R2 that I have from the Millennium Falcon, so I was able to take my time with it.
 0 1 2 3 4 5 6 7 8 9 10 11 12 13 14 15 16 17 18 19 20 21 22 23 24 25 26 27 28 29 30 31 32 33 34 35 36 37 38 39 40 41 42 43 44 45 46 47 48 49 50 51 52 53 54 55 56 57 58 59 60 61 62 63 64 65 66 67 68 69 70 71 72 73 74 75 76 77 78 79 80 81 82 83 84 85 86 87 88 89 90 91 92 93 94 95 96 97 98 99 100 101 102 103 104 105 106 107 108 109 110 111 112 113 114 115 116 117 118 119 120 121 122 123 124 125 126 127 128 129 130 131 132 133 134 135 136 137 138 139 140 141 142 143 144 145 146 147 148 149 150 151 152 153 154 155 156 157 158 159 160 161 162 163 164 165 166 167 168 169 170 171 172 173 174 175 176 177 178 179 180 181 182
This is another of my nephew's. Some of the parts — notably, the disc-launcher blasters and the front landing gear strut — aren't right because I didn't have access to it long enough to model everything accurately, or didn't want to disassemble it far enough to examine them, so I modeled them as best I could from pictures. The curved slope pieces forward of the cockpit and at the back took some doing to get right. I eventually had to resort to using prisms with cubic_spline and conic_sweep to manufacture cones with off-center vertices, which is a trick I think I need to back-port to some of my other models.
 0 1 2 3 4 5 6 7 8 9 10 11 12 13 14 15 16 17 18 19 20 21 22 23 24 25 26 27 28 29 30 31 32 33 34 35 36 37 38 39 40 41 42 43 44 45 46 47 48 49 50 51 52 53 54 55 56 57 58 59 60 61 62 63 64 65 66 67 68 69 70 71 72 73 74 75 76 77 78 79 80 81 82 83 84 85 86 87 88 89 90 91 92 93 94 95 96 97 98 99 100 101 102 103 104 105 106 107 108 109 110 111 112 113 114 115 116 117 118 119 120 121 122 123 124 125 126 127 128 129 130 131 132 133 134 135 136 137 138 139 140 141 142 143 144 145 146 147 148 149 150 151 152 153 154 155 156 157 158 159 160 161 162 163 164 165 166 167 168 169 170 171 172 173 174 175 176 177 178 179 180 181 182 183 184 185 186 187 188 189 190 191 192 193 194 195 196 197 198 199 200 201 202 203 204 205 206 207 208 209 210 211 212 213 214 215 216 217 218 219 220 221 222 223 224 225 226 227 228 229 230 231 232 233 234 235 236 237 238
This set includes three different instruction books. I got it several years ago, but didn't model it when I did the rest of the sets I owned, because it was like 70% new parts, a lot of them complex or otherwise difficult. But I got half the new parts modeling the Imperial Probe Droid, so I figured I'd do these too while I was at it. Several of the parts here could still use some work, particularly the fender piece that forms the dragon's brow and lower jaw, which only roughly approximates the complex curves and recesses of the actual piece.
 0 1 2 3 4 5 6 7 8 9 10 11 12 13 14 15 16 17 18 19 20 21 22 23 24 25 26 27 28 29 30 31 32 33 34 35 36 37 38 39 40 41 42 43 44 45 46 47 48 49 50 51 52 53 54 55 56 57 58 59 60 61 62 63 64 65 66 67 68 69 70 71 72 73 74 75 76 77 78 79 80 81 82 83 84 85 86 87 88 89 90 91 92 93 94 95 96 97 98 99 100 101 102 103 104 105 106 107 108 109 110 111 112 113 114 115 116 117 118 119 120 121 122 123 124 125 126 127 128 129 130 131 132 133 134 135 136 137 138 139 140 141 142 143 144 145 146 147 148 149
The dragon is the largest model in this set, and the spider and ogre contain a strict subset of the parts from the dragon, so they were a lot easier to model, because it was just a matter of assembling and articulating pre-existing parts.
 0 1 2 3 4 5 6 7 8 9 10 11 12 13 14 15 16 17 18 19 20 21 22 23 24 25 26 27 28 29 30 31 32 33 34 35 36 37 38 39 40 41 42 43 44 45 46 47 48 49 50 51 52 53 54 55 56 57 58 59 60 61 62 63 64 65 66 67 68 69 70 71 72 73 74 75 76 77 78 79 80 81 82 83 84 85 86 87 88 89 90 91 92 93 94 95 96 97 98 99 100 101 102
I had never actually even built this model before. The set has been clinging on top of my lamp as either dragon or spider since I got it. All of the parts were already modeled for the dragon, so the hardest part of it ended up being figuring out how to assemble the various sections and pose its arms. Its articulation is pretty sadly lacking and I'm not sure why; there are enough joint pieces in the set going unused — both the dragon and the spider have a lot more articulation — to make it a lot more flexible than it is. I may see if I can do a giant with proper knees and elbows with just the parts from this set.
 0 1 2 3 4 5 6 7 8 9 10 11 12 13 14 15 16 17 18 19 20 21 22 23 24 25 26 27 28 29 30 31 32 33 34 35 36 37 38 39 40 41 42 43 44 45 46 47 48 49 50 51 52 53 54 55 56 57 58 59 60 61 62 63 64 65 66 67 68 69 70 71 72 73 74 75 76 77 78 79 80 81 82 83 84 85 86 87 88 89 90 91 92 93 94 95 96 97 98 99 100 101 102 103 104 105 106 107 108 109 110 111 112 113 114 115 116
As promised, a giant with better articulation, built strictly from the 31073 parts (though I had to use the spare dark red 1×1 plate). The hands and thighs are the same as the ogre's, and the head is only modified slightly — I gave it upper teeth and changed the cheeks. The rest of it is completely rebuilt.
 0 1 2 3 4 5 6 7 8 9 10 11 12 13 14 15 16 17 18 19 20 21 22 23 24 25 26 27 28 29 30 31 32 33 34 35 36 37 38 39 40 41 42 43 44 45 46 47 48 49 50 51 52 53 54 55 56 57 58 59 60 61 62 63 64 65 66 67 68 69 70 71 72 73 74 75 76 77 78 79 80 81 82 83 84 85 86 87 88 89 90 91 92 93 94 95 96 97 98 99 100
The instruction book for this set included instructions for five different designs, several of them with more than one component, so there'll be more of these coming. I didn't need to model any new parts to make this one, but all of the other designs in the set need at least one new part (the tires, if nothing else), so technically I don't think it counts as a new-part-less set. Note that the orientation of the rotors here implies that this is in fact a Soviet chopper... Western helicopter rotors spin counterclockwise.
 0 1 2 3 4 5 6 7 8 9 10 11 12 13 14 15 16 17 18 19 20 21 22 23 24 25 26 27 28 29 30 31 32 33 34 35 36 37 38 39 40 41 42 43 44 45 46 47 48 49 50 51 52 53 54 55
2 of 5. This one needed five new parts (the tires, the 3×4 doors, the crane hook, and the 6×16 plate — except for the tires, all unique in my collection), and a redesign of an old one (the 1×6 arch), which I broke by improving the part it was based on, which I think covers everything that came in the set, so there shouldn't be any more new parts for the rest of it.
 0 1 2 3 4 5 6 7 8 9 10 11 12 13 14 15 16 17 18 19 20 21 22 23 24 25 26 27 28 29 30 31 32 33 34 35 36 37 38 39 40 41 42 43 44 45 46 47 48 49 50 51 52 53 54 55 56 57 58 59 60 61 62 63 64 65 66 67 68 69 70 71 72 73 74 75 76 77 78 79 80 81 82
3 of 5. The worst part of this one was maneuvering the three components in relation to each other.
 0 1 2 3 4 5 6 7 8 9 10 11 12 13 14 15 16 17 18 19 20 21 22 23 24 25 26 27 28 29 30 31 32 33 34 35 36 37 38 39 40 41 42 43 44 45 46 47 48 49 50 51 52 53 54 55 56 57 58
4 of 5. These designs are weird. They're actually closer to being the right scale for minifigs than the standard Town sets, but they're not built for minifigs. The tractor-trailer from the Town sets (6692, which I don't own) has a cab barely big enough to contain a single minifig, while this one is much closer to the correct relative size of a tractor-trailer cab. But you can't actually squeeze a minifig behind the wheel, at least not seated.
 0 1 2 3 4 5 6 7 8 9 10 11 12 13 14 15 16 17 18 19 20 21 22 23 24 25 26 27 28 29 30 31 32 33 34 35 36 37 38 39 40 41 42 43 44 45 46 47 48 49 50 51
And that's the last of this set.
 0 1 2 3 4 5 6 7 8 9 10 11 12 13 14 15 16 17 18 19 20 21 22 23 24 25 26 27 28 29 30 31 32 33 34 35
This is by far the most complicated set I've done. It's not just that there were a lot of complex new parts—though there were: four types of gear (or six, really, because I didn't realize until after I'd already modeled them that this set used older variants of the 24-tooth gears than the ones from the Mindstorms box I was modeling from), several new connector types, including a universal joint, chain links, and some other bits and pieces—or that they connect together in weird, non-orthogonal ways—though they do: the canopy frame even exploits loose engineering tolerances and the flexibility of plastic parts to connect together things that shouldn't quite link up—but that those complicated new parts need to fit together in weird, non-orthogonal ways to form a mechanism where all the parts mesh together in synchronicity while moving and spinning at different speeds.
 0 1 2 3 4 5 6 7 8 9 10 11 12 13 14 15 16 17 18 19 20 21 22 23 24 25 26 27 28 29 30 31 32 33 34 35 36 37 38 39 40 41 42 43 44 45 46 47 48 49 50 51 52 53 54 55 56 57 58 59 60 61 62 63 64 65 66 67 68 69 70 71 72 73 74 75 76 77 78 79 80 81 82 83 84 85 86 87 88 89 90 91 92 93 94 95 96 97 98 99 100 101 102 103 104 105 106 107 108 109 110 111 112 113 114 115 116
Secondary build from 8844. Technically, this isn't an autogyro; just an unstable helicopter. In an autogyro, the rotor is unpowered, and turns by itself (thus αυτος "self" + γυρος "turn") due to aerodynamic effects. Here, the rotor is powered, connected to the same crankshaft that turns the pusher prop, which makes it a helicopter, but it doesn't have a tail rotor or other means of counteracting rotor torque, so it would spin uncontrollably. The rudder control linkage was more hassle than anything else, because it's another of those bits that doesn't actually fit together as advertised; it only works because there's a lot of play in what's basically a 30-stud-long unsupported axle with five loose joints in it. It still doesn't work very well. There's barely any space for the linkage to move between the fuselage and the seat, and it can't even use all of that because the connectors on the rudder wheel jam first. It's got maybe 30° of steer between full left rudder and full right rudder.
 0 1 2 3 4 5 6 7 8 9 10 11 12 13 14 15 16 17 18 19 20 21 22 23 24 25 26 27 28 29 30 31 32 33 34 35 36 37 38 39 40 41 42 43 44 45 46 47 48 49 50 51 52 53 54 55 56 57 58 59 60 61 62 63 64 65 66 67 68 69 70 71 72 73 74 75
This one languished partly finished for ages because I didn't feel like modeling the differential frame and gears. The library file sat open in my text editor, with the empty object declaration for the differential frame unsaved, for literally years before I had to edit it to add parts for the Medieval Blacksmith. I finally got around to finishing it when I was at loose ends after doing the Falcon.
 0 1 2 3 4 5 6 7 8 9 10 11 12 13 14 15 16 17 18 19 20 21 22 23 24 25 26 27 28 29 30 31 32 33 34 35 36 37 38 39 40 41 42 43 44 45 46 47 48 49 50 51 52 53 54 55 56 57 58 59 60 61 62 63 64 65 66 67 68 69 70 71
Secondary build from 8847.
 0 1 2 3 4 5 6 7 8 9 10 11 12 13 14 15 16 17 18 19 20 21 22 23 24 25 26 27 28 29 30 31 32 33 34 35 36 37 38 39 40 41 42 43 44 45 46 47 48 49 50 51 52 53 54 55 56 57 58 59 60 61 62 63 64 65 66 67 68 69 70 71 72 73 74 75 76 77 78 79 80 81 82 83 84


